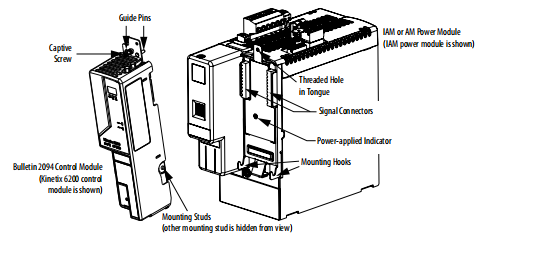
This procedure assumes you have prepared your panel, mounted your Bulletin 2094 power rail,
and Bulletin 2094 power modules. For installation instructions regarding equipment and
accessories not included here, refer to the instructions that came with those products.
2094-EN02D-M01-S0 AB Each control module provides user I/O
(The picture is in the folder.)
Brand:Allen-Bradley Model number:2094-EN02D-M01-S0
Colour:new Warranty: 12 months
Lead Time:3-day working day Country of origin: USA
Price: Please contact us Product weight:0.805kg
Shipping Port: China
Payment: Bank of Chicago, Bank of Singapore
Express cooperation: fedex, DHL, UPS and your express account
Service: Professional Sales provides 24 hours /7 days online service
2094-EN02D-M01-S0 AB Controller module Brand new

Install the Control Modules
The IAM and AM power modules are equipped with two mounting hooks and a threaded hole.
The Bulletin 2094 control modules have two mounting studs, guide pins, and a captive screw for
mating the control module with a power module.
Follow these steps to mount Bulletin 2094 control modules to IAM (inverter) power module or
AM power modules. In this procedure an IAM power module is shown.
1. Remove all input power from the IAM power module.
Verify that the Power-applied indicator is off. When the indicator is on, voltage is
present on the IAM and AM power module signal connectors.
2. Position the control module in front of the power module.
IMPORTANT For convenience and ease of use, mount the IAM and AM power modules on the power rail
before mounting the control modules.
When the IAM power modules are placed on a flat surface, with the power-rail connectors
facing down, the mounting screw that extends from the front of the drive and fastens to the
power rail, pushes back and interferes with the control module installation.
Refer to the Kinetix 6200 and Kinetix 6500 IAM and AM Power Modules Installation
Instructions, publication 2094-IN011, for more information.
ATTENTION: To avoid damage to equipment, do not mount your Bulletin 2094 control
module to the power module when the Power-applied indicator is on. Remove all
input power from the IAM power module before mounting the control module.

2711P-T4W21D8S, 2711P-T4W22D8S, 2711P-T4W21D8S-B, 2711P-T4W22D8S-B, 2711P-T6C21D8S, 2711P-T6C22D8S, 2711P-T6C21D8S-B, 2711P-T6C22D8S-B, 2711P-T7C21D8S, 2711P-T7C22D8S, 2711P-T7C21D8S-B, 2711P-T7C22D8S-B, 2711P-T9W21D8S, 2711P-T9W22D8S, 2711P-T9W21D8S-B, 2711P-T9W22D8S-B, 2711P-T10C21D8S, 2711P-T10C22D8S, 2711P-T10C21D8S-B, 2711P-T10C22D8S-B, 2711P-T12W21D8S, 2711P-T12W22D8S, 2711P-T12W21D8S-B, 2711P-T12W22D8S-B, 2711P-T15C21D8S, 2711P-T15C22D8S, 2711P-T15C21D8S-B, 2711P-T15C22D8S-B
Contact person:Free
Email Address::free@fenoux.com
WhatApp: +86 133 7698 4225
We look forward to your inquiry and will get back to you as soon as possible.